-30%
Jamaican Black Castor Oil


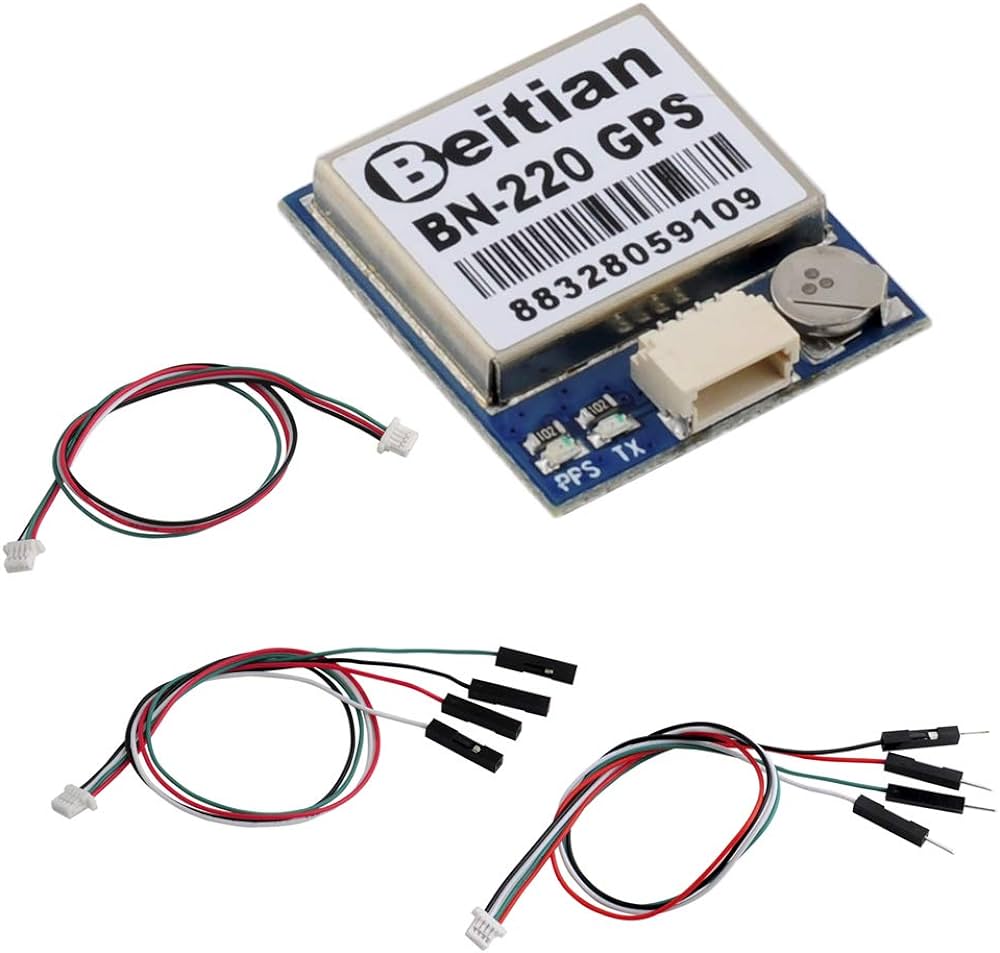
DescriptionThis BN-220 GPS has u-blox M8030-KT chip. It support 4800bps to 921600bps, but default baud rate is 9600bps .Its data level is TTL or RS-232,but default is TTL level. To make it be RS232 output, you need to use one TTL to RS232 converter cable.The BN-220 GPS has flash, so you can save its configuration. When you use it for Raspberry Pi, there is no driver needed.Specificationhere is DatasheetDimension : 22mm*20mm*6mmModule Weight : 5.3gConnector : 1.00mm spacing between the 4pins patch seatElectrical CharacteristicsChipset: u-blox M8030-KTReceiving Format:GPS, GLONASS, Galileo, BeiDou, QZSS and SBASFrequency: GPS L1, GLONASS L1, BeiDou B1, SBAS L1, Galileo E1Channels: 72 Searching ChannelSensitivity:Tracking: -167dBmReacquisition: -160dBmCold start: -148dBmHot start: -156dBmAccuracy:Position Horizontal: 2.0 m CEP 2D RMS SBAS Enable (Typical Open Sky)Velocity: 0.1m/sec 95% (SA off)Timing: 1us synchronized to GPS timeAcquisition Time:Cold Start : 26sWarm start : 25sHot start : 1sData and Update Rate:Support Rate: 4800bps to 921600bps,Default 9600bpsData Level: TTL or RS-232,Default TTL levelData Protocol: NMEA-0183 or UBX, Default NMEA-0183Single GNSS: 1Hz-18HzConcurrent GNSS: 1Hz-10Hz,Default 1HzOperational Limits:Altitude: 50,000m MaxVelocity: 515m/s MaxAcceleration: Less than 4gPower consumptionVCC: DC Voltage 3.0V-5.5V,Typical: 5.0VCurrent: Capture 50mA/5.0VOperating temp: -40 °C ~ 85°CStorage Temp: -40°C ~ 105°CWiring:GND ,TX output ,RX input ,VCC (3.0v-5.5v)Getting started with the BN-220 3.0 V-5.0 V level TTL, GNSS module, M8030, NEO-M8N GPS GLONASS dual module GPS antenna, built-in flash We’re going to look at how GPS can show us longitude and latitude coordinate of our current locations. Hardware requiredArduino UNOGPS NEO-M8N GPS GLONASS Connecting the Hardware1 GND (Black)-> GND2 Rx (White) -> D4 (of Arduino)3 Tx (Green) -> D3 (of Arduino)4 VCC (Red)-> 5v or 3.3VInstalling a library: TinyGPSplusBefore uploading the sample sketch you need to have the TinyGPSplus library. This can be found in Manage Libraries. You can visit here to see how you can add your library.Upload the sample sketchYou can go in examples and find FullExample to sketch. Change line 9 like this:static const uint32_t GPSBaud = 9600;Upload the codes and change the baud rate of the Serial monitor to 115200. The codes should look like this:#include <TinyGPSPlus.h> #include <SoftwareSerial.h> /* This sample code demonstrates the normal use of a TinyGPSPlus (TinyGPSPlus) object. It requires the use of SoftwareSerial, and assumes that you have a 4800-baud serial GPS device hooked up on pins 4(rx) and 3(tx). */ static const int RXPin = 4, TXPin = 3; static const uint32_t GPSBaud = 9600; // The TinyGPSPlus object TinyGPSPlus gps; // The serial connection to the GPS device SoftwareSerial ss(RXPin, TXPin); void setup() { Serial.begin(115200); ss.begin(GPSBaud); Serial.println(F("FullExample.ino")); Serial.println(F("An extensive example of many interesting TinyGPSPlus features")); Serial.print(F("Testing TinyGPSPlus library v. ")); Serial.println(TinyGPSPlus::libraryVersion()); Serial.println(F("by Mikal Hart")); Serial.println(); Serial.println(F("Sats HDOP Latitude Longitude Fix Date Time Date Alt Course Speed Card Distance Course Card Chars Sentences Checksum")); Serial.println(F(" (deg) (deg) Age Age (m) --- from GPS ---- ---- to London ---- RX RX Fail")); Serial.println(F("----------------------------------------------------------------------------------------------------------------------------------------")); } void loop() { static const double LONDON_LAT = 51.508131, LONDON_LON = -0.128002; printInt(gps.satellites.value(), gps.satellites.isValid(), 5); printFloat(gps.hdop.hdop(), gps.hdop.isValid(), 6, 1); printFloat(gps.location.lat(), gps.location.isValid(), 11, 6); printFloat(gps.location.lng(), gps.location.isValid(), 12, 6); printInt(gps.location.age(), gps.location.isValid(), 5); printDateTime(gps.date, gps.time); printFloat(gps.altitude.meters(), gps.altitude.isValid(), 7, 2); printFloat(gps.course.deg(), gps.course.isValid(), 7, 2); printFloat(gps.speed.kmph(), gps.speed.isValid(), 6, 2); printStr(gps.course.isValid() ? TinyGPSPlus::cardinal(gps.course.deg()) : "*** ", 6); unsigned long distanceKmToLondon = (unsigned long)TinyGPSPlus::distanceBetween( gps.location.lat(), gps.location.lng(), LONDON_LAT, LONDON_LON) / 1000; printInt(distanceKmToLondon, gps.location.isValid(), 9); double courseToLondon = TinyGPSPlus::courseTo( gps.location.lat(), gps.location.lng(), LONDON_LAT, LONDON_LON); printFloat(courseToLondon, gps.location.isValid(), 7, 2); const char *cardinalToLondon = TinyGPSPlus::cardinal(courseToLondon); printStr(gps.location.isValid() ? cardinalToLondon : "*** ", 6); printInt(gps.charsProcessed(), true, 6); printInt(gps.sentencesWithFix(), true, 10); printInt(gps.failedChecksum(), true, 9); Serial.println(); smartDelay(1000); if (millis() > 5000 && gps.charsProcessed() < 10) Serial.println(F("No GPS data received: check wiring")); } // This custom version of delay() ensures that the gps object // is being "fed". static void smartDelay(unsigned long ms) { unsigned long start = millis(); do { while (ss.available()) gps.encode(ss.read()); } while (millis() - start < ms); } static void printFloat(float val, bool valid, int len, int prec) { if (!valid) { while (len-- > 1) Serial.print('*'); Serial.print(' '); } else { Serial.print(val, prec); int vi = abs((int)val); int flen = prec (val < 0.0 ? 2 : 1); // . and - flen = vi >= 1000 ? 4 : vi >= 100 ? 3 : vi >= 10 ? 2 : 1; for (int i=flen; i<len; i) Serial.print(' '); } smartDelay(0); } static void printInt(unsigned long val, bool valid, int len) { char sz[32] = "*****************"; if (valid) sprintf(sz, "%ld", val); sz[len] = 0; for (int i=strlen(sz); i<len; i) sz[i] = ' '; if (len > 0) sz[len-1] = ' '; Serial.print(sz); smartDelay(0); } static void printDateTime(TinyGPSDate &d, TinyGPSTime &t) { if (!d.isValid()) { Serial.print(F("********** ")); } else { char sz[32]; sprintf(sz, "d/d/d ", d.month(), d.day(), d.year()); Serial.print(sz); } if (!t.isValid()) { Serial.print(F("******** ")); } else { char sz[32]; sprintf(sz, "d:d:d ", t.hour(), t.minute(), t.second()); Serial.print(sz); } printInt(d.age(), d.isValid(), 5); smartDelay(0); } static void printStr(const char *str, int len) { int slen = strlen(str); for (int i=0; i<len; i) Serial.print(i<slen ? str[i] : ' '); smartDelay(0); }Before uploading the program , Tx and Rx of arduino and GPS must be disconnected then Upload the program and open up the serial monitor from the Arduino IDE. You can now see the coordinates (Longitude ,Latitude) of the place you are.Indicator :Tx Blue: LED flashing-> The data outputPPS Red: PPS LED not blinking ->when GPS not fixed (Wait to get connected), flashing when fixedRESULTOpen serial monitor ,you can now see the coordinate (Longitude,Latitude) of the place you are.It’s now you time to customize according to your wish.Package includes: 1×BN-220 GPS Module 2×Pack of 4pcs Jumper Cable 1×Sticker